How to use the CryBot a.k.a Tutorial

The process is pretty straight forward:

    • Download the Bot on the top right of this page or here.
    • Export the .zip with the decompression software of your choice. Windows 7 and later comes with a zip explorer. Export to a dedicated Folder, I HIGHLY RECOMMEND USING A FOLDER, using your Desktop could result in a mess.
    • Start the “CryBot.exe” in the folder. Once the Bot starts you will have to set it up first.

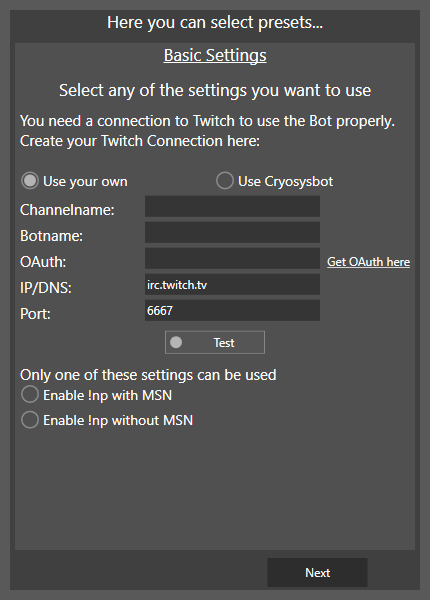
You will see a setup window where you can pre-select settings (you can still change them later on in the settings menu):

There you have 2 options:

    • Use the Bot with your complete custom created bot, the Account has to exist on the Twitch server and you have to have access to it. Just paste the name in, get your oauth from the Bot account over the link to the right and enter your Channelname.
    • Select Cryosysbot at the top and just enter your Channelname, you will use a prepared Account for your Commands, it has some restrictions to it though. You can test if your entered channelname is correct by pressing the Test Button, if its green you are good to go. If its red however that could mean that the name of your channel stored by Twitch is not the same as your login name. You can check the channelname by going to your channel on twitch and checking the URL.
CryBot Setup Settings

Depending on the selected option to either use !np or not you will have different options on the next page.

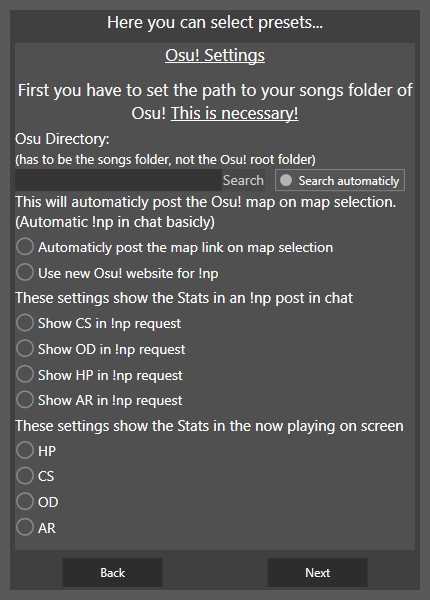
    • If you selected either of the !np options you will see this page.
      Here you can select your Osu! Directory to look for map data when ingame a map is selected. You can try to search for it automatically. It only work if you have a default installation of Osu!. Otherwise you may have to select it yourself. You can still change it later in the settings if you are not sure.

      Under it you have some more options what to do with new map data and what to display in the cursong.txt that is created and updated once a new map is selected. This setting can be customized even more in the Bot settings.
Osu! CryBot Setup Settings

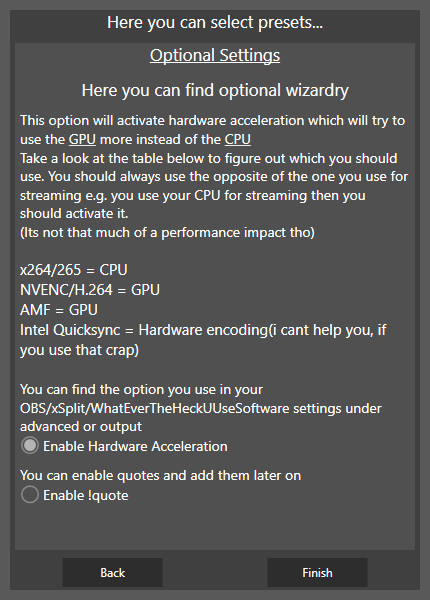
    • If you pressed Next or did not select any of the !np options, you will see this page.
      Here you can select some options depending on your setup. For example: If you have a weak CPU but a decent GPU, you can use the hardware acceleration feature to improve the bots performance and use less CPU resources.
Optional CryBot Setup Settings

Lastly, you can enable quotes that randomly write a quote once a user writes !quote. You can add and remove them in the Bot settings.

All of these settings are basic, the bot has several more options like Link permission, Core affinity, Key overlays and more.


Token

And finally you have to login with your account to use the Twitch API.

After recent changes the API is not anonym anymore and depending on the requests tokens are required. On the login page you will see what type of token CryBot requests on your behalf. It will always state that the Bot want to use your email, that is because the most basic token Twitch hands out is always with the email attribute.
In short i cannot request a lesser token than that, if any statistics at all should be used. Currently the bot cannot operate without the token (working on it tho).

Automatic update

After finishing the login the Bot will search for an Updater update, sounds weird i know. That is just how my update process for the Bot works. It may find one and will show the progress on the bottom. Once the update for the Updater finished the bot will check if he himself has updates. If so a form will be shown that lists the changes, otherwise you can use the Bot.

On the first setup the Bot will always check for updates on the STABLE branch, you can change that in the settings.

This concludes the CryBot Tutorial section, for more infos see the advanced section. Feel free to contact me if you have issues setting up the Bot.